


Editor Designer
Editor scripting made easy!
The Editor Designer allows you to design Editor Windows, Custom Inspectors, etc, with a simple interface that shows you a live preview of the Editor Script before the code is generated. Once you are happy with how your Custom Editor looks you simply generate the code for it by clicking a generate code button.
See the DevLog video below for an example of this in action & follow along in the forum for information on future updates. Feel free ask questions and make requests inside the forum as well.
Forum:
https://forum.unity.com/threads/xeditorhelper-editor-code-generator.515676/
Asset Store:
https://www.assetstore.unity3d.com/en/#!/content/108731
Click an index below to be taken to that section. If viewing this website on either a desktop or laptop, a floating index will be located on the right side of the screen for convenience.
Firstly, If you have just purchased the Editor Designer, Thank you!
If not you can do so here, it would be greatly appreciated!
The below documentation is current to the most recent release of the Editor Designer. (Currently v0.7)
If anything mentioned in the documentation is unclear or you have any other questions feel free to email me via the contact form on this website.
Video tutorials are available on my YouTube channel .
For everything else & to keep up to date with the latest news for the Editor Designer check out the forum.
The Toolbar contains tools & templates for designing / generating your custom editor.
It consists of two main tabs.
Lets begin with the Design tab.
Toolbar - Design
It is from within the Design tab that you add GUI Layout elements & templates to the Hierarchy.
Once added to the Hierarchy these elements immediately become visible inside the Preview window.
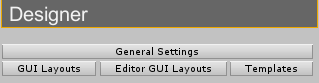
Under the design tab their are four sub categories.
-
General Settings
-
GUI Layouts
-
Editor GUI Layouts
-
Templates
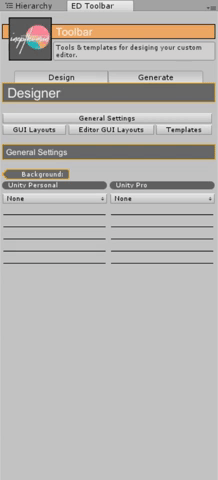
General Settings
As the name implies this sub category is where you edit the general design settings for your custom editor. Things like the background colour of the editor window / custom inspector can be adjusted from here.
1) Background - When setting a background either a Texture or a colour can be applied. A separate background can be set for users using Unity Personal vs Unity Professional.
If Texture is chosen as the background type, you are presented with 4 options;
-
Resource Path - The location of the chosen Texture2D inside your assets. Must be within a Resources Folder. Utilizes Unitys Resources.Load() function. ( https://docs.unity3d.com/ScriptReference/Resources.Load.html )
-
Screen Rect - Adjust the position / size of the background texture. Leaves the values at zero for auto-scaling to be applied.
-
Colour - Adds a colour tint to the texture used
-
Scale Mode - The type of scaling applied to the texture.
GUI Layouts
Add standard GUI Layouts like GUILayout.Space(), GUILayout.BeginArea(), etc... from here. Simply click the corresponding button to add the desired layout.
Editor GUI Layouts
Add editor specific GUI Layouts like float fields, object fields, sliders, etc... from here. Simply click the corresponding button to add the desired layout.
Templates
This sub category contains pre-made templates designed by myself to help further improve your development time. In future updates the template category will also allow you to create your own re-usable templates.


-
Description - A standard label with a helper box GUI Style applied to it.
-
Icon - Adds a custom Texture2D or one of Unitys in-built Textures as an icon.
1) Pre-Made Templates - Templates that come standard with the Editor Designer.
-
Title - An advanced GUI Layout that leverages a number of GUIStyle elements allowing you to create both simple & complex headings / titles quickly. Add a title by clicking the title button. Once added, edit the appearance of the Title by first selecting in the ED (Editor Designer) Hierarchy & adjusting the fields inside the ED Inspector.

Toolbar - Generate
The Generate tab of the Toolbar is where you pass in any required parameters & select options for generating out your Editor Code. Generally this step is left to last after the design phase of your Custom Editor is complete. However if working on a custom inspector an export type should be selected early on in the the design phase to ensure any variable fields added know which variables they correspond to inside the target script.
The required parameters need for generating out the designed code vary depending on the chosen export type. I will go into further detail about what each of these are and do.

-
Namespace - Enter a namespace to wrap your generated class inside of.
-
Editor Class - The name of the generated class. i.e. The name of your script.
-
Target Class - The name of the script whose inspector you are editing.
-
Add Menu Item - When true, a menu item will be added.
-
Menu Item - The name/path of the menu item.
e.g. inepthuman/Editor Designer/Toolbar
-
Export Type - The type of custom editor you are designing.
-
Language Type - The programming language that the generated code is written in.
Generate Code Button - Click this button to generate out the code for the custom editor you have designed. If everything is in order you will be prompted with the following message.

The Hierarchy lists any GUI Layouts or Templates currently in use & lets you re-arrange them by dragging and dropping them inside the hierarchy.
Certain elements are displayed differently depending on their type.
e.g. A "Title" elements background colour matches the fill colour of the Title it represents.
This helps distinguish it from other elements of the same type.
Adding elements
New GUI Layouts & Templates can be added via the Toolbar.
See the Toolbar - Design section of the documentation for more information on this.
Removing elements
GUI Layouts & Templates can be removed by clicking the small minus button on the right hand side of each element.
Selecting elements
To select an element from inside the hierarchy simply hover the mouse over it & click it. It will then be highlighted in a semi-transparent blue box to indicate it has been selected.
When selected, options for that element will be displayed inside the ED (Editor Designer) Inspector.
See the Inspector section of the documentation for more information on this.
Re-arranging elements
The elements of the Hierarchy can be re-arranged by clicking & dragging the element to a new position.

The Preview window displays a live rendition of what the Custom Editor you are designing will look like. This allows you to see and edit things in real-time without the need to manually make changes in the code first.
** In future updates of the Editor Designer you will be able to re-arrange, scale, & move things directly from inside the Preview Window!
The Inspector lets you inspect selected hierarchy elements. Depending on what element you have selected you will be presented with different options.
Most of the options are self evident by their label. However if an option is ever unclear, hover your mouse pointer over the label of said option to have a tooltip appear. The tooltip will display a message with some more detailed information about that option.
Otherwise try adjusting some of the values while keeping an eye on the preview window. The purpose of the option should quickly become clear.
For more information on hierarchy elements see the Hierarchy section of the Editor Designer documentation.


